VOM clock is an indispensable device for hardware repair people in particular and electronics in general. To help newcomers know how to measure and use watches. The article on how to use the VOM clock and how to use it will help you somewhat.
VOM watches have a variety of prices from 100k – 1 million. Expensive watches have more functions such as frequency measurement, Mosfet test…. Because there are no conditions to use, my article only mentions this metal watch that only costs about 120k.
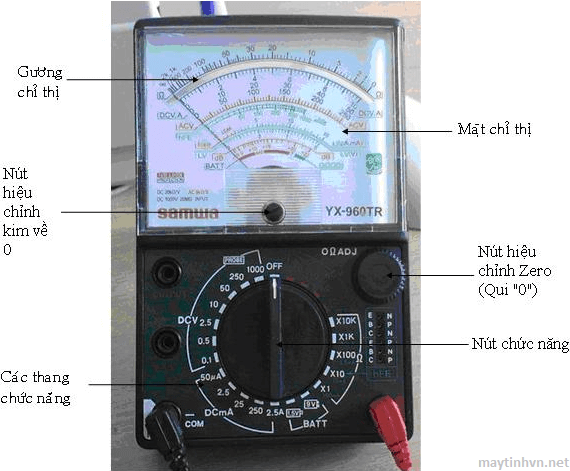
1. Shape
_VOM clock uses 2 primary 1.5v batteries and 1 large 9v battery. Includes needle, display glass, knob to zero, scale adjustment, 2 black and red measuring wires.
_ Symbols on VOM
Ω : Ohm ( ohm ) : unit of resistance.
V : Volt (volt) : unit of voltage.
A : Amp : unit of current.
DC : Used to measure DC voltage.
AC : Measure AC voltage.
DCV: DC voltage.
ACV: AC voltage.
The VOM meter has the following two main parameters:
Measuring stage: On VOM, there are 4 stages including Ω, ACV, DCV, Ampere.
Scale: In the measuring phase, there are many scales. For example: Phase measuring DCV (volts) includes the scale: 0.5V, 2.5V, 10V, 50V… When measuring we should adjust the scale accordingly for more accurate parameters. If measuring 3.3V source, we adjust the scale higher and the nearest is the 10V scale.
2. Use of VOM clock.
VOM meter includes the following main uses:
Measure DC and AC voltages.
Measure continuity to see if the circuits are connected. Kind of like measuring a wire to see if it breaks. Adjust the clock to the X1 ohm scale. If the clock goes to zero, the circuit is open, if it doesn’t, the wire is broken.
Measure the reading of the resistor.
Check the discharge of the capacitor.
Measure amperage, this function is also rarely used.
3. How to measure with VOM meter.
+ Measure voltage:
DCV . DC voltage measurement
Turn the knob to the DCV scale to reach the appropriate scale with the value to be tested.
The red rod clamps onto the (+) terminal of the object to be measured.
The black rod clamps onto the (-) terminal of the object to be measured.
Read the measurement results on the DCV display arc that matches the scale. For example, when measuring a voltage of 10v, we adjust the scale to 10v then read the result and display DCV 10V.
Note: When measuring, you must determine the correct negative and positive poles.
Measure AC voltage ACV
Switch the knob to the ACV scale set at the 250 ACV scale, clamp 2 test leads to the 2 ends to be measured.
Read the measurement results on the ACV measurement value display frame.
Important note: AC voltage is very dangerous, so when measuring, it is necessary to pay attention to ensure safety. Absolutely do not put the scale of resistance or current measurement into the AC voltage. If left wrong, it will be damaged, burn the resistor in the meter.
+ Measure resistance
Adjust the X1 scale to hug and short the red and black rods together. Then turn the calibration knob to the correct zero position for a more accurate measurement.
Adjust the Ohm scale to match the resistance to be measured: including the X1, X10, X1 Kohm and 10 Kohm scales.
Place the red and black rods in the position of the resistance to be measured. Then look at the value on the displayed arc Ω for the X1 ohm scale. For other scales it is necessary to take the value displayed on arc X (multiply ) by the scale. For example, we adjust the clock at X10 ohm scale and the reading on the display is 15, the resistance value is = 15 x 10 = 150 Ohm.
If when measuring the needle only inched up a little or nearly all of the needle, we need to adjust the appropriate scale to make the measurement more accurate.
+ Measure the discharge of capacitors : Capacitors and ceramic capacitors
Measuring capacitors: Capacitors are large capacitors that are abundant on the mainboard and polarized + and – . Capacitors are rarely shorted, most of them are dry capacitors, so the discharge charge is not good. To measure the charge discharge of the capacitor, follow these steps.
Remove the capacitor you want to measure from the mainboard, and use a new capacitor with the same voltage and capacitance parameters to compare.
Set the clock to the X1 or X10 scale. Proceed to put the black rod on the – pole, the red rod on the – pole, read the parameter. Then reverse the probe and read the reading.
Similar to the above measurement with the new capacitor, and conduct comparison.
If measuring 2 capacitors, the clock hands are equal and return, it’s still good. In contrast, the old capacitor has a lower needle than the new capacitor is dry.
Measuring ceramic capacitors: Ceramic capacitors are small capacitors (stick capacitors) and are not polarized. Ceramic capacitors are often shorted, detected.
Remove the suspect capacitor from the motherboard. Set the clock to X1K or X10K scale. Place the red and black rods on the two ends of the capacitor, read the display and reverse the probe.
If the clock hands go up and then down to the initial position, the capacitor is good. If the needle goes up but does not return to its original position, the capacitor is detected. If the needle goes to 0Ω and does not return, it is short.
There is also a function of measuring amperage, due to little use, I did not mention it. Those are


Pin 9 volt có tác dụng gì. Sao gỡ nó ra đồng hồ vẫn đo bình thường. Cám ơn