Hi guys!
The job of assembling the machine into the box seems to be simple, but many people still do not pay attention, so the assembly also takes a lot of time. As for the assembly of the new machine, it is simple and rarely causes errors, but assembling the old machine in, or removing the machine for cleaning often causes a lot of diseases. Diseases related to the disassembly of the machine such as: disassemble the machine to clean it, the machine does not receive the usb, the speaker is in the front port, there is no power or hdd indicator light. So you need to pay special attention when assembling the machine into the box.
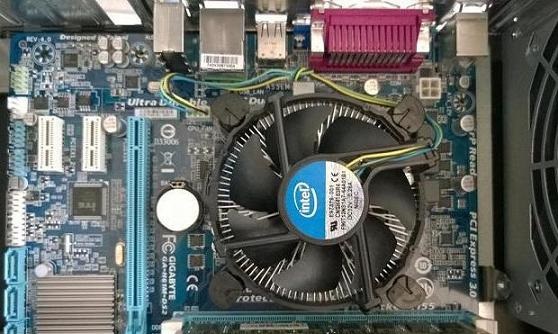
_First you need to attach the ram, cpu, fan to the mainboard first, not the mainboard first, this is very important because the disease related to cleaning the machine is mostly due to attaching the cpu to the back. Attach the mainboard, pay attention to attach the cpu fan correctly. Because if you install it incorrectly, it will make the machine not up because the cpu is channeled, the contact is not enough pins, making the machine run for a while and then turn off due to heat. As shown in the picture above is the mainboard Gigabyte GA-H61M-DS2 this main uses socket 1155 patched. The attached fan is similar to the socket 775 I mentioned: remove and assemble the cpu fan
_After fully attaching the ram, cpu and fan, you proceed to screw the liner into the case (for new boxes, people have not attached, or not properly attached to their main). To screw the liner, you put the main in and see where on the main there is a mounting hole for the liner, I attach it, the nut should be tightened with pliers so that when I screw the screw to fix the main with the case it doesn’t run. Note that you must attach enough screws to the holes on the main, attach it when you press the power cord, or attach the ram to make the mainboard bent.
_ After attaching the liner, proceed to attach the power to the box, attach the aluminum fe piece to cover the rear ports of the mainboard and put the main in to tighten the screws, tighten the screws, don’t tighten too much, experience should be tight enough, but old main when tighten will make the mainboard touch the mass and not up.
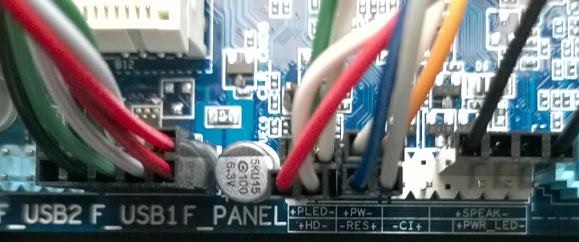
_ Attach the usb panel wires, audio, external speakers, power cords, reset. Mounting the panel of the USB should attach the USB1, audio port, there is only 1, attaching these 2 panels is simple because people do it monolithically, so just attach it in the right direction. Panel of led, power is a bit complicated. Usually on the main, people have instructions for me where is pw, res, pled, hd led. Main is written right at the panel (as shown above), main is written near ram slot, chipset. Attach the power cord and reset it, you can attach it in any direction, it doesn’t matter the – and + poles. Just put it in the right place. As for the power light panel and the hard drive light, you must attach the correct polarity – and +, then it will run. Usually the + pole is the red and green pin and the – pole is white.
_Next is to attach the 24-pin power cord to the main (20 pin also works normally), 4-pin wire for vcore cpu power, attach power cord for DVD drive, sata cable for DVD, hard drive. Note that on the motherboard with SATA ports numbered from o to 4, you should prioritize port number 0 for hard drives and port numbers 1, 2, and 3 for DVD drives. The first port is still the most optimal.
After attaching all the power cords, the cables are fully connected. The drill brother has attached the power cord to the hard drive, must test the machine to see if it’s up or not, then the machine will turn on and then attach the power cord to the hard drive and then attach the case cover. Doing so to avoid the case of turning on and off killing the hard drive -> data loss. That’s it, good luck.


